Wednesday, April 16, 2008

T-Shirts available to buy on RedBubble

We have made some our designs available to buy on T-Shirts through the website www.redbubble.com.
Here are the thumbnails of the t-shirts available with links to the corresponding pages where they are available to buy.

Spraypaint Can by rudeboyskunk Orange Squash by rudeboyskunk Ken Sent Me by rudeboyskunkRude Boy by rudeboyskunk Speak Your Mind... (black print) by rudeboyskunk Stop the Violence... (white print) by rudeboyskunk Psycho Clown by rudeboyskunk Emo is the new gay by rudeboyskunk Anti Racism T-Shirt by rudeboyskunkJudge Not... by rudeboyskunk See, Hear and Say Nothing by rudeboyskunk Guru by rudeboyskunkDice by rudeboyskunk Plastic Zen Tunes by rudeboyskunk Speak Up by rudeboyskunkBloop by rudeboyskunk Breakout by rudeboyskunk Plonk by rudeboyskunkS.W.A.T. by rudeboyskunk Jack by rudeboyskunk Polizei by rudeboyskunk

Photoshop Tutorial: How to create a glossy web button

In this tutorial I am going to be showing you how to create a glossy looking web button like the one you see here.


Step 1: Make a new document 100 pixels wide by 50 pixels high.

Step 2: Set the foreground colour to the colour that you want. I will be using #066ceb for this tutorial but you can use any colour you want. Make sure the background colour is white.


Step 3: Use the elipse tool to draw an oval. This will be the shape of the button.


Step 4: From the layer menu select layer/layer style/inner glow and use these settings.


Step 5: From the layer menu select layer/layer style/inner shadow and use these settings.


Step 6: Use the type tool to add a text layer with the text that you want on your button.


Step 7: With the text layer selected select layer/layer style/bevel and emboss and use these settings.


Step 8: Duplicate the shape layer and drag it so that it's on top of the text layer. You should now have the text layer between the 2 shape layers like this.


Step 9: Change the fill of the top layer to 0% and the opacity to 25%


Step 10: Delete the background layer and your button should now look like this.


You now have the finished button and that takes us to the end of this tutorial.

Tuesday, April 15, 2008

Photoshop Tutorial: How To Create Metallic Text

In this tutorial I am going to show you how to create metallic text like the image shown below.


Step 1: Create a new file 500 pixels wide by 200 pixels high


Step 2: Hit "D" to set the foreground colour to black and the background colour to white


Step 3: From the filter menu select filter/noise/add noise and use these settings.


Step 4: From the filter menu select filter/blur/motion blur and use these settings


Step 5: Hit ctrl+F to apply the same filter again. Your image should now look something like this.


Step 6: Use the Horizontal Type Mask Tool add whatever text you want. Use a nice thick font like Impact or Arial Black. For this tutorial I am going to be using Impact.


Once you have finished typing click on the move tool and you should have a selection looking like this.


Step 7: Hit Ctrl+Shift+I to invert the selection.

Step 8: Right click on the background layer and select Layer from background and name it texture.

Step 9: With the texture layer selected hit Delete to remove the selection.

Step 10:Hit Ctrl+D to deselect it. Your image should now look something like this.


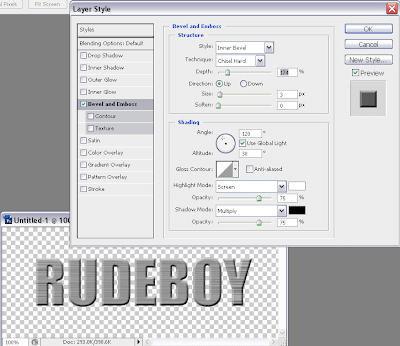
Step 11: With the texture layer selected go to the layer menu and select layer/layer style/bevel and emboss. I have used these settings but the settings may need to be adjusted to work with the font that you have chosen to use.


Step 12: If you want you can create a metallic background using steps 3-5 on a new layer beneath the one with the text. I have rotated it slightly to give it a bit of a twist.

If you have followed the instructions step by step you should now have some text with a metallic effect like the image below.


Buy my t-shirts